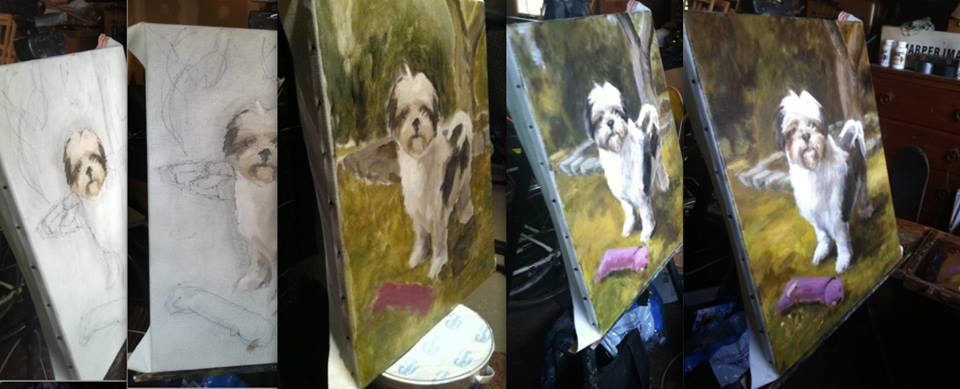
 I've done a few blog posts in the past that showed my overall process for commission work, but I haven't written a lot about the application of paint layers. So, I've decided to do a step-by-step demo with more information about the technique I use to apply paint. I always enjoy seeing 'in progress' shots because I feel like they teach me a lot about the way the artist conceived of the painting. This also helps break down some works that seem impossibly well done into manageable stages. Here's an outline with some tips that I hope helps you guys out. Step 1: TRANSFERED INK OUTLINE 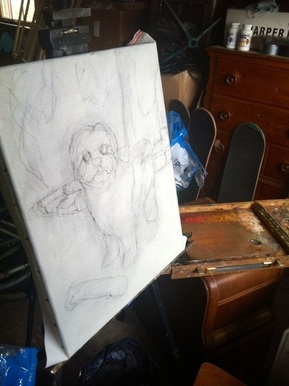 The most important step is this first step. And this is because of the fact that this is where the composition is set. You can change minor elements later on and tweak some edges, but the overall shapes have to be set in this stage. Since I'm focusing on the painting itself, I am leaving out all the sketches and preliminary work that I have done for this painting. This post is about the painting itself, which I'm sure people find more enticing than all the back-end work that is so crucial to the success of the painting. There are two ways to handle this stage- 1: you can transfer the drawing from a large sheet of paper or 2: you can draw directly on the canvas. For smaller works, I like to draw with vine charcoal on the canvas and the use a gel ink pen to make a final outline. For larger paintings, you can do draw with charcoal on a sheet of tracing paper and then use transfer paper to transfer your drawing onto the canvas. HERE is a picture of an example of the transfer method. Either method that you choose will ultimately end with a permanent ink line on your final canvas. Go for the large shapes right now. You can see in this picture that the background is really loose and even the dog looks like a cardboard cutout. It's okay to have some areas loose, but make sure your main elements are defined. Once I have the ink line, I brush a thin coat of Grumbacher Copal Medium onto the surface and let it dry. This step does two important things: it seals the surface so it's not as absorbent and it seals the ink line so that it doesn't show through the finished painting. Let the painting dry overnight or for a few days before you begin the next step Step 2: OIL-OUT AND BE BOLD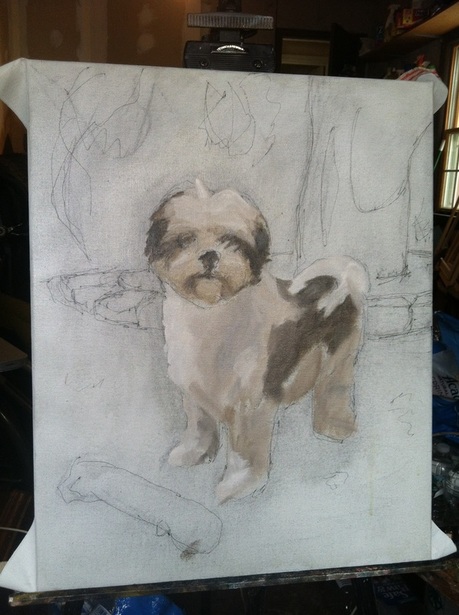 The first layer of paint can be kind of intimidating. I always feel like I don't want to ruin anything right away or make any major mistakes in the first layer. This is the wrong way to think. You have to make mistakes and the bolder you are with this stage the more successful your painting will be. I know it sounds counter-intuitive, but having fear and being timid in this early stage will only hinder you. You have an outline to guide you and all your reference material to eliminate fear at this stage so don't worry about too much right now. Before you begin, oil-out your canvas with whatever medium you prefer. I don't pay too much attention to what I have in my medium cup. It's often a combination of Copal Medium, Turpenoid, Dammar Varnish and various oils. To read more about oiling-out -- check out this blog post. Keep in mind to use large brushes and focus on the large planes of the painting. Large shapes are all you should care about in this early stage. Once again, there are a couple ways to approach this step. You can focus on the individual elements or you can focus on the larger composition. I often focus on the larger composition, but for this one, I couldn't figure out the background right away so I started with the shapes of the dog. You can see how simple the dog looks in this stage. Be careful not to overwork these early stages. Let the paint dry so that you can build the surface up slowly. It's slow in the beginning and often times can be difficult to stop yourself from overworking. Step 3: KEEP WORKING ON LARGE SHAPES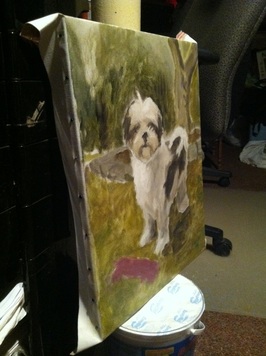 Once I finished the large planes of the dog, I began to loosely scumble in the background and shapes. The patrons wanted her favorite dog toy to be in the foreground so I scumbled in the basic shape and mid-tone color of the dog toy. The scumble is fairly thinly applied, but it is not thinned with medium, it is thinned by brushing it roughly onto the canvas. Working in thin layers allows the layers to dry rather quickly before you begin a new layer. I find that when I get frustrated, it means that I need to take a break and let the painting dry. Never work when you feel angry because you will end up destroying the painting. Keep working steadily with the large shapes still in mind. And remember to oil-out between every layer so that you don't have a dry-looking canvas to work on. Step 4: 80 % DONE IS THE HARDEST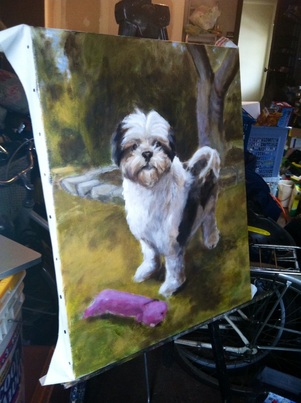 Paintings often progress surprisingly quickly even though the layers are quite thin. I love this process because the paint solidity is built up in 3-4 layers, which is actually pretty quick. But I always feel that the last 20% takes the longest and drives me the most insane. This is the hardest stage for me because there are no more clear cut goals such as filling the blank canvas. This is also the make or break stage when it turns from 80% done to 90% done. Something usually looks 'off' or 'wrong' in this stage and it's your job as the artist to figure out what is 'wrong' or 'off'. I wish I could help you discover what's wrong with your painting, but that's what separates amateur paintings from pro paintings. You have to be hard on your self and discover what the hell and how you can fix it. The only tip I can give you is to simply keep working. Don't settle if something is still irritating you about the painting. I often endure a tortorous 4-5 hour block of painting when the painting goes from "I want to burn this" to "it doesn't look so bad." Step 5: 95 % DONE - SIGN IT It may sound half-assed, but I often put down the brush and sign the painting when it's 90-95% finished. The reason I do this isn't because of laziness, but because the painting becomes very very fragile and easily ruined around 95%. I love detail and finish, but I love spontaneity and surface beauty more. Of course, there's no red flag that pops up to say when it's done; that's something that I think comes with practice. I still have a lot of trouble knowing when the painting is finished. And often I savor the last stage because it's such a long and beautiful process and I don't want it to end. Once I reach a point where I can't make a significant improvement to the painting, I put the brush down and let it dry before I sign it and varnish it. -I hope I was able to shed some light on the process of painting that I use. I'm still learning every day so I'll keep writing as I learn more- 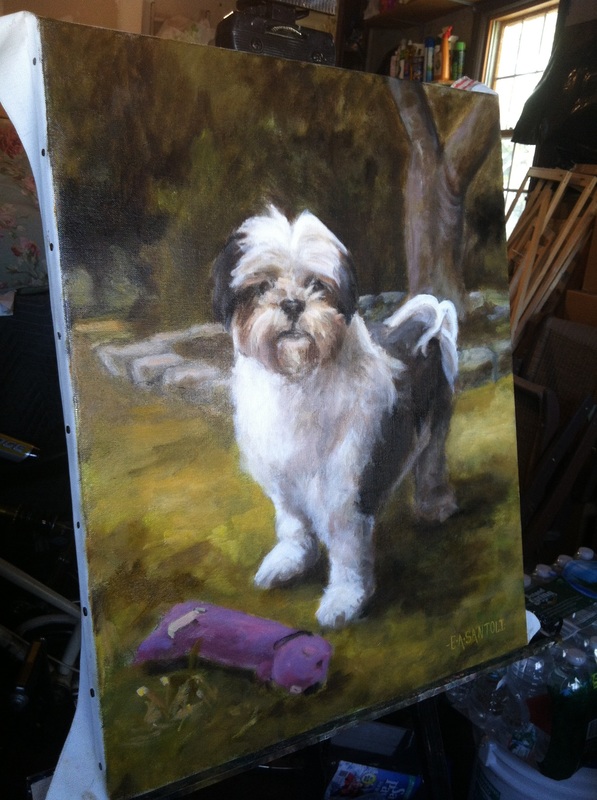
0 Comments
Your comment will be posted after it is approved.
Leave a Reply. |
Archives
July 2024
Categories
All
|
 RSS Feed